Trick Staircase
Materials 1/4"x12"x18" plywood; 1/2"x6"x12" plywood; 1/4"x1 1/8"x24" lattice; 3/4"x3/4" (1x1)x24" pine; 3/4"x1 1/2" (1x2)x 12" pine; 1/4"-diam.x6" dowel; 1/2" diam.x1" dowel; 12"x24" plastic-laminate (see General Directions); No. 18 wire.
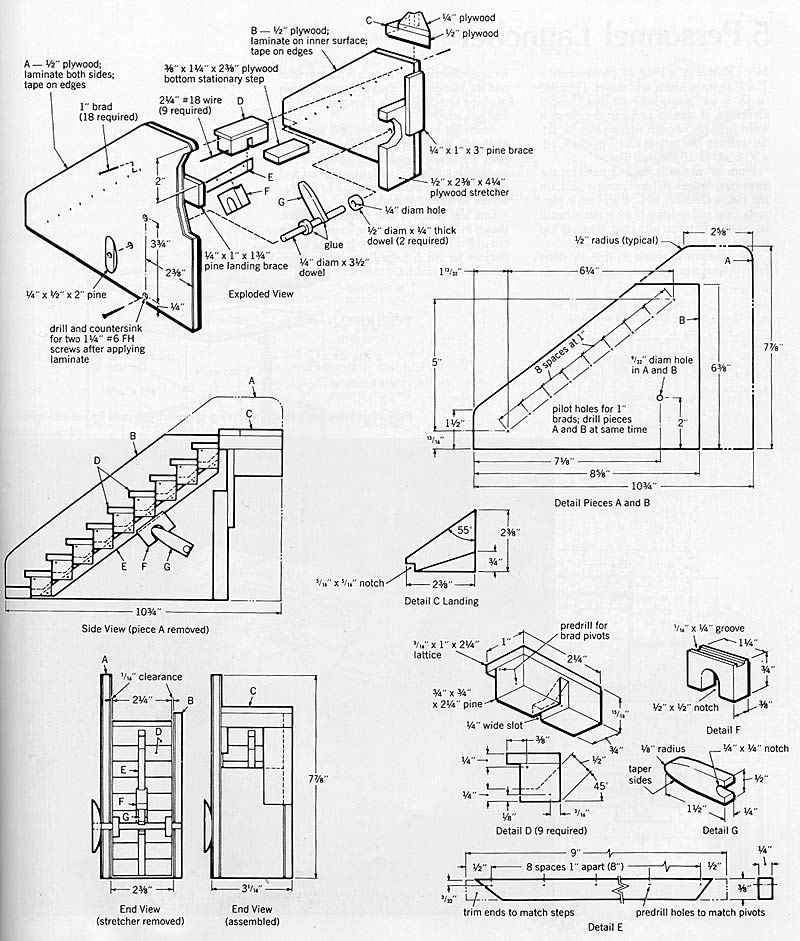
Note Considerable accuracy is required for the trick staircase to work properly. For best results, use jigs to cut steps with their angled slots, and to drill pivot holes in steps.
Cut out steps (plus a few extra in case of mishaps) from 1x1 pine. Cut 1/4" slot in each, as shown, and then drill for brad and wire pivots, Cut treads and glue in place.
Cut out part E; drill as shown. Connect it to each of the steps with 2 1/4" wires.
Cut out sides A and B from 1/4" plywood. With pieces clamped together as shown in Details A and B, drill brad pivot holes and dowel holes.
Cut out part G, 1/4"-diam. dowel. Drill 1/2"-diam. dowels before cutting into 1/4" slices. Also cut the stationary step and rear 1/2"-plywood block.
With stationary step and reare block in place, insert dowel through its holes and mark positions on it for part G and the collars. Take apart and glue parts on their marks.
Cover the outside of the large side A with laminate. Drill dowel holes and countersunk pilot holes for screws through laminate and plywood. Do not drill to expose brad pivot holes, which remain covered with laminate.
Attach block, brace and stationary step to side B as shown. With side A lying on its laminate, place and clamp it near the edge of work surface so that dowel hole is not covered. Place brads in side A's pivot holes and then each step's hole over corresponding brad. Place dowel in its hole in side A. Now attach side B, placing other end of dowel in its hole; glue on stationary step, then glue and screw side A into block.
Insert brads through pivot holes in sides into matching holes in blocks. Cover holes with masking tape.
Cut out part F. Place it on part E in relation to part G; mark. Cut and drill dowel handle; glue in place. Cut and attach step top and landing C.